GeoEdit – edit the contents of Geocaching.com .LOC files
This
project was suggested by Rich Wolf. As
Premium Subscribers of geocaching.com, both Rich and I have customized
inquiries using “Pocket Query Generator”. www.geocaching.com
sends us the output as e-mail attachments.
That facility allows a pretty high degree of customization – but one
thing it doesn’t provide is an exclusion list.
If, for example, I ask for all the caches in a 20 mile radius of
my home, that I haven’t found and that have a terrain rating of 3 or
less, There are some caches on that list that I have no interest in
finding.
When
driving around with my GPS receiver, those caches come up as being nearby over
and over again; Rich and I wanted a way to get them out of the .LOC file. The fact that they also appear in the Palm
compatible .PRC format is no problem because I only consult the Palm if I’m
going after one. It’s frustrating to
look it up on the Palm and find it’s one I have decided
I don’t want to do.
Rich
asked if I could write something to handle it; the result is GeoEdit.
GeoEdit
..
is a DOS program that runs in a window on any version of Windows. The distribution consists of a ZIP file name
GeoEdit.zip containing
six files that provide the GeoEdit function plus this Word document. All (except the Word document) must be
unzipped into a folder of your choice; it doesn’t matter if they are alone in
the folder (or which folder name you use) but they do all have to be together in the same one.
After
the files are unzipped (into, for this example, c:\geoedit) the user
should create a desktop shortcut that points to one of the files, ge.bat. In our example you’d point to c:\geoedit\ge.bat.
See
Advanced Topics at the end of this document for instructions on how to
create the desktop shortcut.
Double-clicking
on the shortcut (I suggest naming it “GeoEdit”) will bring up the program. Here’s the main screen:

Note: near the
bottom of the above screen the legend describing how the SPCL KEYS
work. For more on this, consult
Interface Standards in the Appendix.
Using GeoEdit:
From
the main screen either press “Y” for “Proceed? (Y/N):” or press F10 to proceed to the next screen:
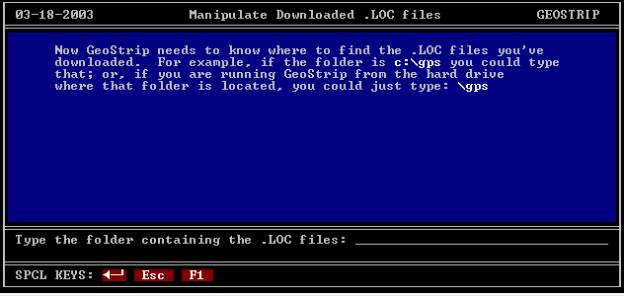
Type
the folder name where your .LOC files are located. Notice the Special Keys and their purpose. In our example, we’ll type: \gps and press ◄─┘.
If
this is the first time you’re using GeoEdit there wouldn’t be a file of
waypoints to exclude so you’d see this screen:

You
wouldn’t be using GeoEdit if you didn’t already know the waypoints you want to
exclude from your list. On this screen you
type them in, one by one; the maximum number of excluded waypoints is 144 (I
don’t think you’ll need that many!) As
you type them in, they are listed for you on-screen so you can be sure you
typed them correctly. If you make a
mistake you can use the Esc key to work
backwards through them making corrections.
Here’s what it looks like with four waypoints to be excluded:
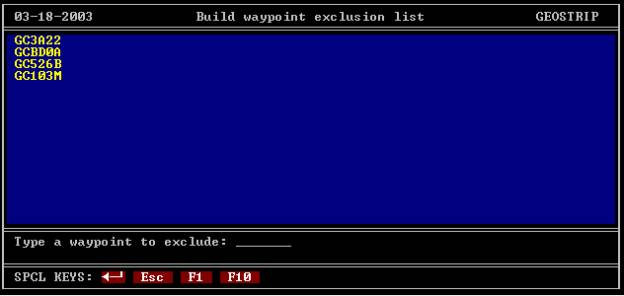
Incidentally,
you don’t have to type the “GC” prefix; the program will automatically put the
GC prefix on for you if you don’t (a feature we’d really like on the
geocaching.com site!) Once you’re
satisfied with the list, press F10 to accept
your work. The program creates the file
exclude.txt in the same
folder where you told GeoEdit your .LOC files are located and will use that file
from now on. If you later want/need to
edit that file manually, see Advanced Topics in the Appendix.
At
this point, GeoEdit goes to the specified folder and examines all the .LOC
files there for valid naming conventions.
Since GeoEdit is a DOS program, you must use .LOC file names that are
seven characters or less in length and must have no embedded blanks. Should GeoEdit finds any that don’t meet
that specification, it will put up a screen like this:
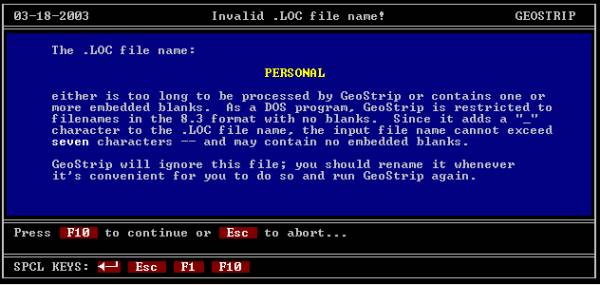
The
subject file will be ignored if you proceed.
Or you can use Esc to abort,
rename the file and start GeoEdit anew.
Again,
since this is the first time you’re using GeoEdit, the program now will ask if
you want to manually add waypoints to be placed in all the .LOC files. You might wish to create one or more of
these to supplement those in the downloaded files. For example, I put in my home coordinates and others for bases of
operations when I travel. I find this
very useful. Waypoints you include here
will be added to each output .LOC files so when you import them into your GPS
receiver and/or EasyGPS it will be easy to sort the waypoints into “proximity
to home” order. After pressing F10 above, here’s the next screen:
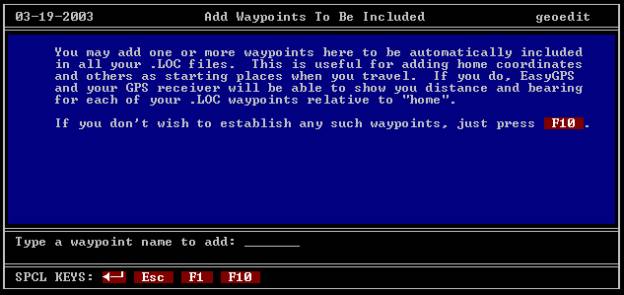
If
you don’t want to add any waypoints manually, just press F10
. If you change your mind later and
want to add one or more, there are two ways to handle this; see Advanced
Topics in the Appendix.
If
you type a waypoint name, you’ll see a series of four questions to answer to
specify your waypoint coordinates. As
you do, each answer will be put up on the screen for review. Note: When asked for the
latitude and longitude, GeoEdit uses the geocaching.com format; that is, N33
56.630 rather than the all-decimal W84 format.
The rules are simple: The first character must be n, e, s or w (case
doesn’t matter). Then comes the number
of degrees as 1, 2 or 3 digits. Then a
space, then the number of minutes with as many decimal places as you like (and
will fit). When you’ve answered all
four questions for a waypoint you’ll see this screen:

Press
“Y”es or F10 to
accept this and GeoEdit will offer to accept another set of fields for another
waypoint to include – and will continue to do so as long as you wish. When you’re done entering waypoints (and
press F10), GeoEdit builds the file include.txt (in the same
folder where your .LOC files reside) which will be used from now on to
automatically include those waypoints in every output .LOC file. If you want/need to edit that file manually,
see Advanced Topics in the Appendix.
As
soon as both the exclude.txt and (optionally) include.txt files have
been generated, GeoEdit will do its work.
It will only take a few seconds and you’ll see this screen:
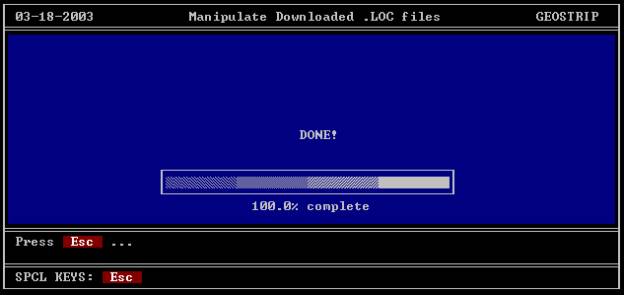
If
you’re lucky (and have a lot of .LOC
files), you may see the progress bar as GeoEdit does its work.
You’re
all done! Press Esc and the program will
terminate. If you set up your shortcut
correctly (See Appendix - Exit on close) the window will close.
In
the same folder where the input .LOC files are located will now be a set of new
.LOC files with the same name, only with an “_” concatenated to the front of
the file name. In our example, we
started with 925.loc. There’s now a _925.loc file as
well. And there’ll be a new matching
.LOC file for each existing .LOC file in that folder.
Open
up EasyGPS and open one of the new .LOC files (_925.loc in my example).
Here’s what mine looks like:

Notice
I’ve highlighted one of my added records (my “home” cords). If you right-click on the record you’ll get
a window that will allow you to click on “Set Active Point”. Then you can scroll right until you see the
“Distance to Active Point” column.
Click on the heading for that column and all your waypoints will be
sorted by proximity to home!

All
that’s left to do is to connect your GPS Receiver and download your
caches. Enjoy!
Support:
Questions? Comments? Bugs? Contact GeoEdit@chazcone.com
Appendix
Troubleshooting:
GeoEdit
is a DOS program running in a Window.
Because it’s a DOS program, file and folder names that don’t follow
DOS conventions won’t work. Sorry ‘bout that!
Also,
embedded blanks in file names and folder names aren’t permitted. Solution? Rename your folder where your .LOC
files are stored to folder names without embedded blanks AND no
longer than eight characters.
For
example, if your .LOC files were located in c:\geocaching\gps
downloads,
GeoEdit won’t work (since both “geocaching” and “gps downloads” are more than
eight characters long – and “gps downloads” has an embedded blank to
boot!). When you try to specify that
path, GeoEdit will give you an error screen:

and
you can either exit or correct it (if a typing error).
GeoEdit Options:
GeoEdit
is controlled by a file named geoedit.ini located in
the same folder as the GeoEdit program files.
If it doesn’t exist it will be created
automatically the first time you run.
There
are four possible records you can have in geoedit.ini to help
control GeoEdit operations:
1) folder = xxxxx this
record contains the path to your .LOC files.
The first time you run GeoEdit you’ll be interviewed for this location;
thereafter, GeoEdit puts it in the geoedit.ini file so you
won’t have that question again. If you
ever want to change the path to your .LOC files, the way to do that is to edit
the geoedit.ini file
manually; see Advanced Topics.
Alternatively, you could just delete the geoedit.ini file and
allow GeoEdit to remake it for you; then you’d be prompted for the new path..
2) add this record, if present, means
you wish the manually entered waypoints in include.txt (if any) coordinates to be added in all GeoEdit output .LOC
files. If you elect not
to add manual waypoints during setup, GeoEdit you can later decide to restore
the prompt to enter them by manually editing the geoedit.ini file. See Advanced
Topics to see how.
3) auto this record, if present, makes GeoEdit run in automatic mode, eliminating the
initial operator “Proceed?” prompt. It
only works when an exclude.txt file already exists.
This record is absent by default. You can add this record to geoedit.ini manually; see
Advanced Topics.
4) slow this record, if present, slows
the operation of the program slightly so you can watch it work; it is absent by default. You can add this record to geoedit.ini manually; see
Advanced Topics.
Advanced topics:
Creating a desktop icon for
GeoEdit:
Right-click on an empty area of your desktop. You’ll get a menu
with several choices. Click “new”, then
“create shortcut”. Browse to the location of ge.bat (it’s in the same folder as the
rest of the GeoEdit program files) and select it. It will be in the folder into which you unZIPped the files in GeoEdit.zip
When asked for the name of the shortcut, use “GeoEdit”.
Now you can double-click that icon to
run GeoEdit. If, when you exit GeoEdit,
the DOS window doesn’t close, right-click on the icon, choose “properties” and,
on the program tab click the “Close window on exit” checkbox. Click OK and the next time the window will
automatically close when you exit GeoEdit.
Creating/editing exclude.txt manually:
The
GeoEdit interface was designed for the novice.
The management of the exclude.txt file might be
easier done using Notepad or any other ASCII editor.
Just
put one waypoint per line. The entries
are not case-sensitive and needn’t be entered in any particular order. Here’s a printout of the exclude.txt file from our
example:
GC3A22
GCBD0A
GC562B
GC103M
Creating/editing include.txt manually:
Include.txt is the file that contains the
five-record sets describing your manually included waypoints. It can be edited using Notepad or any other
ASCII editor. The records must be
entered in the order shown in my example below:
Home
Home base
N36 56.630
W84 21.064
+++++++++++++++++++
The records are:
1)
Waypoint name
2)
Description of waypoint (optional; if unwanted use a blank line)
3)
Latitude in geocaching.com notation like: (N36 56.630)
4)
Longitude in geocaching.com notation like: (W84 21.064)
5)
Anything you wish as a divider; just has to be at least one
character
Note: There must be exactly FIVE (5) records per waypoint.
Hint:
If you name your manually included waypoint(s) cleverly, you can
force it/them to the top of the list in EasyGPS with a single mouse-click. All the waypoint names from geocaching.com
start with “GC”. Start your manually
named waypoint(s) with a blank (or any character alphabetically before “G”) and
that single click on the waypoint column header will force them all to the top
– easier to select as the active waypoint that way!
Editing geoedit.ini manually:
If you need or want to change the contents of geoedit.ini, you can do so with Notepad or
any ASCII editor. See GeoEdit Options
above for the records than can be in geoedit.ini and for its location.
Making manual changes to
waypoints in EasyGPS:
When you use EasyGPS to make a change to a .LOC file, it writes
the changed file in a proprietary format that cannot be used with GeoEdit. For that reason, you’re urged not to save
any changes into the original input .LOC but to make those changes to the
output .LOC file. That is, don’t use
EasyGPS to change 925.loc but instead, make EasyGPS changes only to _925.loc
Should you inadvertently change the input file, GeoEdit will
no longer be able to operate on it.
GeoEdit may stop with a program error (or not) but EasyGPS will absolutely
no longer be able to read the _925.loc file created from a saved 925.loc file!
In other words:
Original file: 925.loc ® run through GeoEdit ® new _925.loc
Then, if you use EasyGPS to make changes to _925.loc = OK!
But if you use EasyGPS to make changes to 925.loc and then try to run it through GeoEdit,
it may seem to work – but you will never again be able to use that file with
EasyGPS!
Interface Standards:
The
GeoEdit program is written to the standards I’ve been using for DOS development
for twenty years. Here’s a description
of the relevant parts of the interface:
1)
The title bar has the program/function title
centered with the date on the left end and the program identifier on the right
(GEOEDIT)
2)
The body is blue with white lettering, 77 bytes
wide by 16 lines high. Instructions and
help appear in this area. Two other
font colors are also used for special conditions; see Character Display
below
3)
The Message area appears next. It’s a pair of lines where the next instruction for the user appears. One-line messages are also displayed there
as a result of an editing failure.
4)
The Special Key area can contain as many as a dozen
keytop symbols described as “Special” in some way. When such a key appears in the Special Key area, that key is
active and it’s standard function will be performed when the key is
pressed. The special keys used by
GeoEdit are:
a.
Esc This
key, if displayed, when pressed causes the program to “go back” one step.
Repeated use of this key, when active can exit the program altogether
b.
F1 This
is the Help key. If displayed, pressing
it will cause a help screen to be displayed.
c.
F10 Panel accept. If it’s
displayed, pressing it will cause the screen to be accepted and the program
will move forward one step
d. ◄─┘ is the “enter” key. It’s used to terminate typing an entry
In
the main screen (see Page 3above) the active Special Keys are Esc, F1, and F10., If you
were to press Esc you’d
exit the program. If F1, a help screen would appear. If
F10, it would be the same as pressing “Y” to the question in the
message area.
Character display:
Information provided by the program for the user to read is
shown in white
characters on the blue or black background.
Emphasis is provide by bright white characters. Bright yellow characters are used when user-provided
information.